How to Convert STL to STEP
This guide shows you the basics of converting an STL file to a STEP file. STL files are a 3D mesh format mostly used by 3D printers, but in the world of engineering CAD and CAM, most software requires solid models. The most universal solid model format is STEP (.stp, .step). Ideally you'd begin with a solid model and avoid STLs entirely, but maybe you found the perfect object on Thingiverse or you used a 3D scanner, and there’s no reasonable way to begin with a solid model. Or maybe you're already doing solid modeling, but you need to incorporate an STL model into it. This guide shows you a file conversion process that has worked well for me.
Disclaimer: STL files span a wide range. Some of them are low-complexity, watertight, and can be easily converted. Others are extremely complex, full of holes and self-intersections, and will cause the conversion application to crash. If your STL file is of the second type, you won't be able to convert it. That being said, if you have no other option, it’s definitely worth a shot!
Step 1: Download a Conversion Tool
Our conversion tool of choice is FreeCAD because it’s free, relatively simple to use, and does a good job of converting STL files to usable solid models. Download it here.
Step 2: Import Your STL File
Open FreeCAD.
Create a new file (File menu > New).
Import your STL file (File menu > Import > select your STL file).
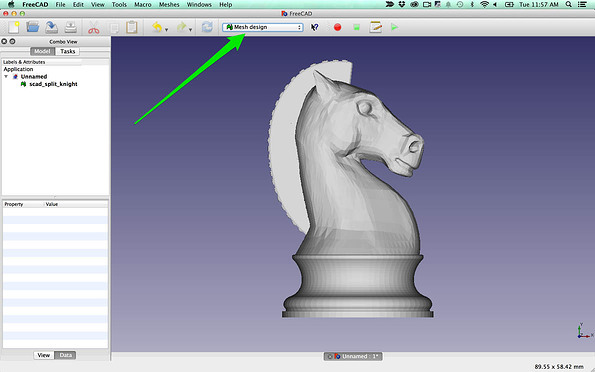
From the dropdown menu in the top toolbar, choose Mesh design (see screenshot).
Step 3: Repair the Mesh
Open the Evaluate & Repair mesh tool (Meshes menu > Analyze > Evaluate & Repair mesh).
Select the mesh from the dropdown at the top of the Evaluate & Repair pane.
One by one, go down the list, clicking Analyze and then Repair if the analysis finds any problems.
If clicking the Repair button for "Folds on Surface" makes your mesh look terrible, you can skip that one.
If clicking the Repair button for any other option makes your mesh look terrible, you’re likely out of luck. However, you should still try the next steps in case you get lucky.
Step 4: Convert Your Mesh to a Shape
From the toolbar dropdown menu, choose Part.
Select your mesh in the left pane.
From the Part menu, choose "Convert to shape."
Leave the Sewing Tolerance at 0.10 and click OK.
Step 5: Convert the Shape to a Solid
This is the moment of truth! If FreeCAD is able to convert the shape to a solid, you’ll be able to save it as a STEP file. If you get a red error message in the bottom left corner of the screen, you’re out of luck.
Select the newly created shape.
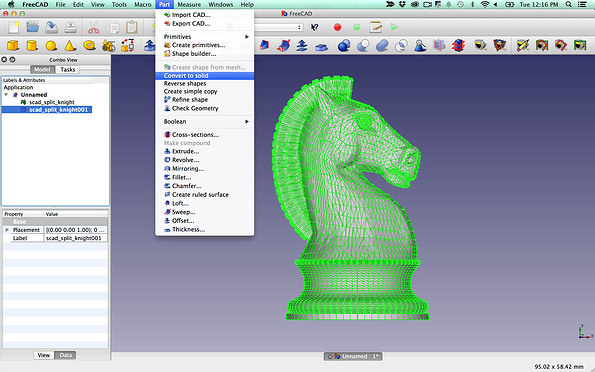
From the Part menu, choose "Convert to solid."
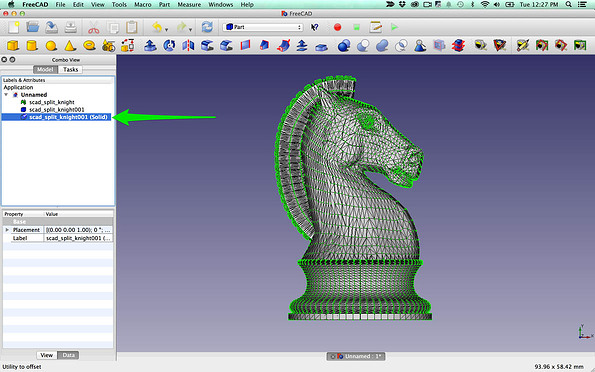
If it works, you’ll see a new item in the list in the left pane that ends in "(Solid)."
Step 6: Export Your Solid to a STEP File
Select your newly created solid file in the left pane.
From the File menu, choose Export.
From the Export dialog, choose "STEP with colors (*.step *.stp)".
Save your file.
You're done!
You can now import your STEP file into other software and do things like generate toolpaths for milling on a CNC mill. If that's your plan and you haven't done it before, we like Fusion 360a lot. Its CAM features are the most user-friendly we've found. But CAM is a deep subject; if you’re not familiar with it, we recommend going through Fusion 360’s CAM tutorials and reading our Fusion 360 guide. If you're interested other common file conversions for CAM, check out How to Convert Gerber Files into G-code using FlatCAM.


